Learning to ride a hoverboard for the first time is exciting – but it can also be a bit nerve-wracking. Don’t worry, with the right approach and safety precautions, you’ll be gliding like a pro in no time. This beginner’s guide to riding a hoverboard will walk you through step-by-step on how to get on, maintain your balance, move around safely, and avoid common mistakes. We’ll also highlight important safety tips (like gear you should wear) to ensure your first hoverboard experience is fun and accident-free.
Hoverboards, also known as self-balancing scooters, actually do a lot of the balancing work for you with their internal gyroscopes – but you’ll still need to get a feel for how to control it. Let’s start with the basics: getting comfortable with the board and setting yourself up for a safe ride.
Step 1: Gear Up for Safety
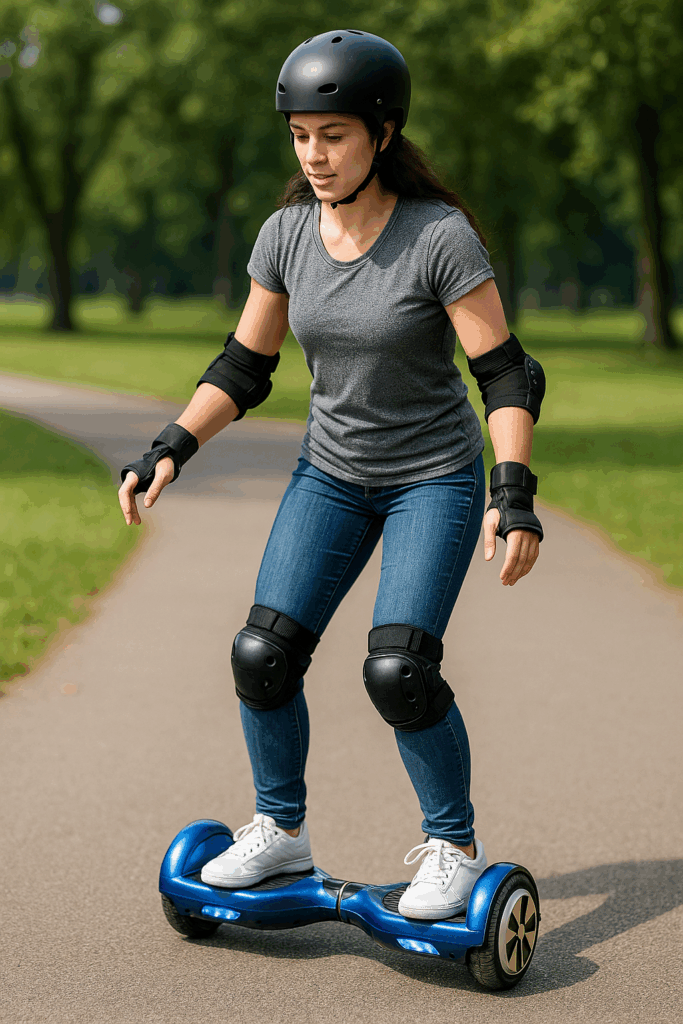
Before you even turn on your hoverboard, make sure you’re dressed for a safe practice session. Safety gear is a must for beginners (and honestly, it’s wise for all riders):
- Helmet: Wear a proper fitting helmet (like a bicycle or skate helmet) every time. It protects your head in case of a fall, which is especially important while you’re learning.
- Wrist Guards & Pads: Falls from a hoverboard often mean you’ll put your hands out or land on knees or elbows. Wrist guards can prevent sprains or fractures, and knee/elbow pads help avoid scrapes and bruises.
- Proper Shoes: Wear flat, closed-toe shoes with good grip (sneakers are perfect). Avoid sandals, heels, or going barefoot – sturdy shoes help you maintain control on the board’s footpads and protect your feet.
Dressing right might feel a bit cumbersome, but trust us – even a low-speed tumble can sting. It’s better to be safe as you build your confidence. Now that you’re geared up, let’s get familiar with the hoverboard itself.
Step 2: Find a Safe Practice Area
Choose an ideal spot for your first hoverboard ride. Flat, smooth, and open is what you’re looking for:
- A spacious driveway, empty garage, or a quiet parking lot with smooth pavement works well.
- Avoid areas near traffic, crowded sidewalks, or steep hills for now. You want as few hazards as possible.
- It helps if you have something to hold onto at the very beginning – like a railing, wall, or a steady friend – when you’re first stepping on.
By starting on a flat surface, the hoverboard’s self-balancing mechanism will have an easier time, and you won’t have to deal with bumps or slopes until you’re ready. Good lighting (daytime or a well-lit area) is also important so you can clearly see your surroundings.
Step 3: Mounting the Hoverboard (Stepping On)
This is the moment of truth for every beginner – getting on the hoverboard. It’s normal to feel a bit anxious, but follow these tips to mount smoothly:
- Power On the Hoverboard: Most hoverboards have self-balance that engages when powered on. So turn the board on and set it down in front of you. The board should be level and still.
- Start with One Foot: Stand directly behind the hoverboard, facing forward as if you were about to step onto a stair. Place your dominant foot on the center of the first foot pad (whichever foot you’d naturally step up with). Keep your weight on your back leg for now.
- Step Up Quickly and Confidently: The key is to bring your second foot onto the board fairly quickly once the first foot is secure. Look forward (not down at your feet), and step up with your second foot onto the other pad. Try to distribute your weight evenly on both feet as you do this.
- Don’t Overthink Balance: Let the hoverboard’s electronics do their job. The board will wobble for a split second as it adjusts, but the gyroscope will balance it. Keep your knees slightly bent (a little flex helps with stability) and stand upright.
Pro Tip: As you step on, commit to it. Hesitation can make the board tilt unexpectedly. It’s like hopping onto a bicycle – if you do it slowly and fearfully, it’s harder to balance than if you do it in one smooth motion.
If you feel unsteady, grab that wall or friend’s shoulder for support until you find your balance. It usually takes a few seconds to get used to the weird sensation of the board balancing under you. Take a deep breath – you’re now standing on a hoverboard!
Step 4: Finding Your Balance
Now that you’re on the board, stay still for a moment and get comfortable:
- Feet Position: Ensure your feet are flat and centered on each pad, facing forward. Don’t have your toes or heels hanging off – your whole foot should be on the board for maximum control.
- Posture: Stand straight but relaxed. Look ahead, not down. Keep your knees bent just a little (this helps absorb any small movements and keeps you from being too stiff).
- Stay Calm: It’s normal if the board feels a bit “wiggly” under you at first. The self-balancing tech is making micro-adjustments. Trust it – you don’t need to make wild counter-movements. In fact, the more still and centered you stand, the less the board will move.
Practice just standing and balancing for a minute. If you feel the board start to drift forward or backward, resist the urge to jump off. Instead, gently lean in the opposite direction to correct. You’ll quickly learn that slight shifts in your weight will control the hoverboard’s movement.
Many beginners are surprised that balancing on a hoverboard is easier than it looks. Once you’re stable, you’ve passed the biggest hurdle. From here, it’s about learning to move around smoothly.
Step 5: Basic Movements – Forward, Backward, and Turning
Time to move! Start with slow, gentle motions:
- Moving Forward: Slowly lean your body weight forward by pressing down with your toes. It’s more of a subtle shift than an actual bend at the waist. As you do, the hoverboard will begin to roll forward. Keep the movement slight; you’re just aiming for a slow creep at first. To stop, ease your weight back to neutral (stand straight again) – the board will level out and halt.
- Moving Backward: Lean back by pressing your heels down. Even more than forward, be gradual here – a sudden backward shift could toss you off balance. The board will roll in reverse. Again, return to center to stop.
- Turning Right: To turn in place or in a small radius, push your left toes down (and/or drop your right heel). This will make the board pivot to the right. The more pressure, the faster the turn – but as a beginner, do this very lightly until you get used to the responsiveness. For a gentle turn while moving forward, you can combine a slight forward lean with a bit more pressure on the left foot.
- Turning Left: Opposite of above – push your right toes down (or left heel) to pivot left. Remember, think of it like “press down in the direction you want to turn with the opposite foot.” It can feel a bit counterintuitive, but with practice it becomes automatic.
As you practice these, keep your eyes forward (where you want to go), not down at your feet. Your body tends to follow where you look, and it also helps maintain balance. Make your movements smooth and moderate. Quick, jerky leans can make the hoverboard respond abruptly, which might throw you off. It’s all about gradual weight shifts.
Spend some time doing slow figure-eights or wide circles. This helps you get comfortable with alternating pressure between feet and coordinating movement. You’ll likely wobble or over-steer a few times – that’s okay! Just step off, regroup, and step back on to continue (we’ll cover the right way to step off next).
Step 6: Dismounting (Stepping Off Safely)
Learning to safely get off the hoverboard is as important as getting on. A common mistake is hopping forward off the board – this can send the board shooting out behind you. Instead, follow these steps:
- Come to a Full Stop: First, make sure the hoverboard is as still as possible (not moving forward or back). You should be balanced and stationary.
- Step Off Backward, One Foot at a Time: Take your dominant foot and step back off the board, placing that foot on the ground behind the hoverboard. Then quickly step off with the other foot. Stepping back is key – it prevents the board from rolling. Imagine you’re stepping off a stair backward. The hoverboard might wiggle a bit as you dismount, but if one foot is firmly on the ground you won’t fall.
- Avoid Stepping Forward: Never step forward off a hoverboard; this is a recipe for the board to zip forward from under you. Always step off to the back.
Practice dismounting a few times in your practice session. It might feel awkward initially, but making a habit of the proper technique will save you from spills. If you ever feel like you’re losing balance while riding, it’s often better to step off than to fight a fall – just remember to step back and clear of the board.
Additional Safety Tips for New Riders
Now that you know how to get on, ride, and get off, keep these extra safety tips in mind as you continue practicing:
- Start Slow: Every hoverboard has its own sensitivity. Even if you’ve seen people zoom around, get comfortable at slow speeds first. Many boards have beginner modes or even learning keys – use them if available, as they cap the speed and make controls less twitchy.
- Keep Shoulders Level: When turning, beginners sometimes unintentionally lean their whole body (shoulders tilting) which can throw off balance. Try to keep your shoulders level and just use your feet/ankles to control tilt. Think of steering more with your lower body.
- Watch for Obstacles: While practicing, be mindful of any bumps or debris on the ground. Hitting even a small stick or crack can stop one wheel and jolt the board. Until you’re skilled, avoid transitions like going up ramps or over bumps.
- No Wet Surfaces: Hoverboards are generally not waterproof. As a beginner, you definitely want to avoid slick or wet surfaces – the wheels can lose traction, and water could damage the electronics. Ride only on dry, clean ground.
- One Person at a Time: It should go without saying, but don’t try to ride with someone else on the board (no piggybacking or having a friend’s feet on there). It’s designed for one rider’s weight and movement.
- Take Breaks: Balancing can use muscles you’re not used to engaging (you might feel it in your calves or core). When learning, take short breaks every 15–20 minutes to rest. This will help prevent fatigue which can lead to sloppy riding or falls.
Common Beginner Mistakes to Avoid
Being aware of common pitfalls can help you avoid them:
- Staring Down at Your Feet: This tends to make people hunch and lose balance. Always keep your head up and eyes looking out where you’re going. Trust your feet placement and the board.
- Over-Leaning: It’s tempting to really lean to go or stop, but too much can overwhelm the balance system. Small leans do a lot. If you need to accelerate or brake faster, do it in controlled increments, not one big shift.
- Tensing Up: Riding stiffly (locked knees, rigid stance) actually makes balancing harder. Stay loose and let your legs absorb movement. If you feel wobbly, bend your knees a tad more and center your weight.
- Panic Jumping: If the board starts doing something unexpected, your instinct might be to jump off forward. Train yourself to step back off instead. Panicking can lead to falls – it’s better to slowly step off than leap.
- Ignoring Warnings: Many boards will beep if you’re going too fast or if the battery is low. Don’t ignore those sounds. Slow down if it’s beeping at high speed, and definitely stop riding if the battery is almost drained (a hoverboard may brake suddenly when the battery dies – you don’t want to be on it when that happens).
Building Confidence
Every expert rider was a beginner once. It’s okay if it feels weird for the first 10 or 15 minutes. With each minute of practice, you’ll get steadier. A good exercise is to practice mounting, riding a short distance, stopping, and dismounting repeatedly. This drills the fundamentals into your muscle memory.
Once you’re comfortable, you can start to explore more – perhaps try a gentle ride down the sidewalk or around a park path. Always stay mindful of your surroundings; remember that on a hoverboard you’re shorter than on a bike and fairly quiet, so pedestrians or bicyclists might not see/hear you coming. Yield to others and ride in control.
If you have friends who also hoverboard, consider practicing together in a safe area. Sometimes a more experienced rider can give you tips by watching you and correcting your stance. Plus, it’s fun to learn together (just keep a safe distance apart to avoid collisions).
Conclusion and Next Steps
By following this beginner’s guide, you should be well on your way to mastering the basics of hoverboard riding. To recap, start with safety gear and a safe practice area, mount the board confidently, keep your balance with relaxed posture, and use gentle weight shifts to move around. Take your time – speed and fancy tricks can come later once you’ve got solid control.
Learning how to ride a hoverboard safely is the foundation for a lifetime of enjoyment with these devices. As you grow more confident, you can explore things like higher speeds, smooth carving turns, and maybe even some fun hoverboard tricks down the road. Always continue to prioritize safety: even when you’re good at it, wear that helmet and be considerate of where you ride.
Ready to put your skills to use? When you feel comfortable, you might start thinking about riding around the neighborhood or using the board for short errands. Just be sure to check out our article on Hoverboard Laws and Where You Can Ride to know the rules in your area, and read our Hoverboard Safety Tips for all riders to keep safe out there.
Call to Action: If you found this guide helpful and are excited to start your hoverboard journey, consider exploring our selection of beginner-friendly hoverboards at HoverboardRadix.com. We offer models with training modes and top-notch safety features – perfect for new riders. Stay safe, have fun, and happy hoverboarding!
Anns is a contributor at HoverBoardRadix.com. We are committed to providing well-researched, accurate, and valuable content to our readers.